 airbrakecompressor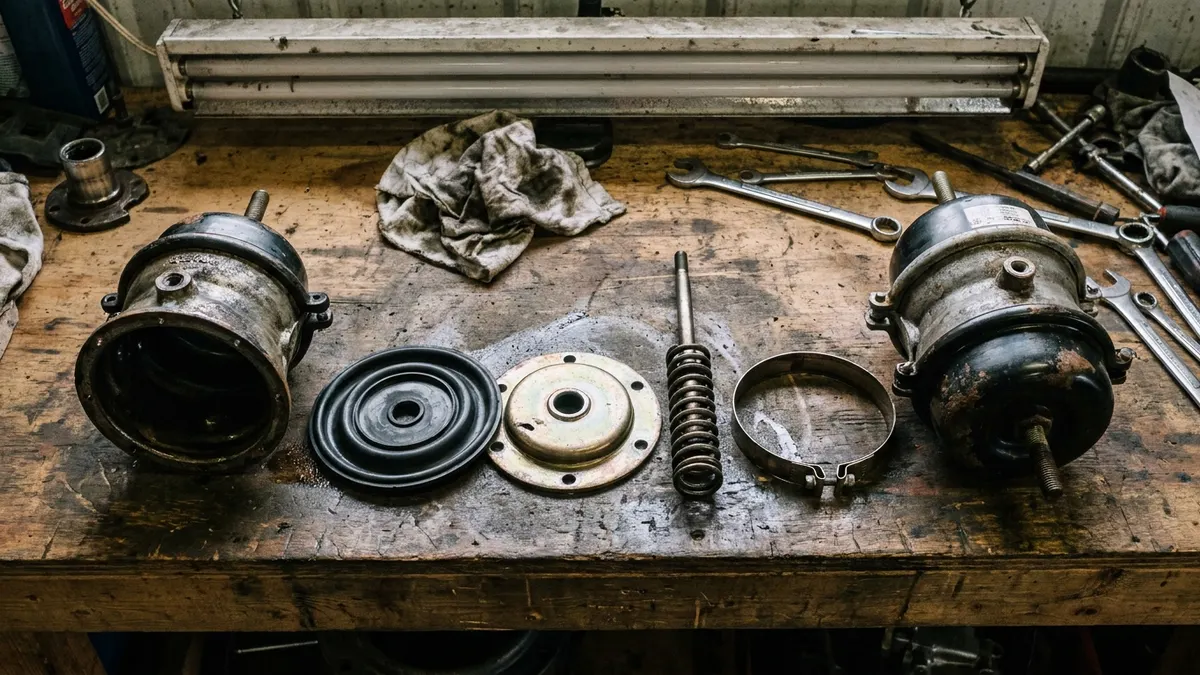
A brake chamber diaphragm replacement kit rebuilds the service side of an air brake chamber by supplying a new rubber diaphragm and the clamp hardware that seals it. On a truck or trailer, that flexible rubber disc is what turns reservoir air pressure into mechanical force at the pushrod, so when it cracks or perishes the brake leaks air and loses its stroke. A kit is a low-cost fix for the service brake chamber, but it only covers the pneumatic service side, never the spring side.
What the diaphragm actually does
Air brakes are pneumatic, not hydraulic. When you press the treadle valve, air from the tanks (fully charged around 120 psi) flows into the service chamber and pushes against a rubber diaphragm clamped between two steel housings. The diaphragm bows outward, drives the pushrod, and rotates the slack adjuster and S-cam to apply the brake. Release the pedal and a return spring pushes the diaphragm back. That rubber membrane flexes on every brake application for the life of the truck, which is why it eventually fatigues.
In a combination spring brake chamber (a 30/30, for example), the front half is this service diaphragm and the rear half holds the parking power spring. Only the front, air-applied service section is rebuildable with a diaphragm kit.
Why diaphragms fail
Rubber has a service life. Heat cycling, road salt, ozone, oil contamination from a worn compressor, and constant flexing all break it down. Typical failure modes:
- Pinhole or crack — a steady hiss, often only when the brake is applied, and rising air consumption that makes the compressor cycle more often.
- Full rupture — the chamber will not build force, the pushrod stroke goes long, and that wheel end drops out of adjustment.
- Perished sealing bead — the diaphragm edge no longer seals at the clamp band, so air escapes around the seam.
If you hear air escaping from a chamber, confirm it against the other symptoms of a leaking brake chamber before condemning the part, since a bad hose, fitting, or O-ring can mimic it.
What a diaphragm kit includes
Contents vary by manufacturer and chamber design (clamp-ring type versus rolled-lip). A basic kit is just the diaphragm; a fuller kit adds the sealing and protective parts.
| Component | Purpose | Usually included? |
|---|---|---|
| Service diaphragm | The rubber membrane that moves the pushrod | Always |
| Clamp band / ring | Clamps the two housing halves and seals the diaphragm edge | Often |
| Pushrod boot / dust seal | Keeps grit and water off the pushrod and non-pressure housing | Sometimes |
| Return spring | Retracts the diaphragm on release | Occasionally |
| Breather / non-return valve | Lets the non-pressure side vent without drawing in dirt | Occasionally |
Match the kit to the chamber type and stroke — a Type 24 diaphragm is not a Type 30, and long-stroke chambers use a deeper diaphragm than standard-stroke units. The size is stamped on the chamber or the clamp band.
Safety first: never touch the spring side
The parking power spring inside a spring brake chamber is compressed with enough force to kill or maim if released uncontrolled. It is a sealed, non-serviceable assembly. If the spring side is the problem, replace the whole spring brake chamber — do not open it.
Before any work, chock the wheels, drain the tanks or fully cage the spring so the parking brake cannot slam the pushrod while you have the chamber apart. If the vehicle has spring brakes on that axle, follow the correct procedure to cage the brake chamber first.
How to replace the diaphragm
- Park on level ground, chock the wheels, and note the pushrod position and any orientation marks on the housings.
- Cage the spring brake (if fitted) and drain the air system so no pressure remains at the chamber.
- Mark the two housing halves so you reassemble at the same clock position, then loosen the clamp band. On rolled-lip chambers the band is not reusable — use the new one.
- Separate the housings and lift out the old diaphragm. Inspect the pushrod, return spring, and sealing surfaces for corrosion or scoring.
- Seat the new diaphragm with the sealing bead in its groove, keeping it flat and untwisted.
- Reassemble the halves on your alignment marks and fit the clamp band; torque the clamp fasteners to the maker's spec so the seam seals without crushing the rubber.
- Recharge the system, let the governor cut out (roughly 120–135 psi), and apply the brakes while listening and using soap solution to check the seam for leaks.
- Set the slack adjuster and measure applied pushrod stroke to confirm it is within limits, then release the caging bolt.
Getting stroke right matters as much as sealing the leak; verify it against the pushrod stroke limits for that chamber size so the wheel end is legal and safe.
Rebuild the diaphragm or replace the chamber?
A diaphragm kit is the right call when the chamber housing and pushrod are sound and only the rubber has failed — common on clamp-type service chambers. Replace the complete chamber instead when the housing is rusted through, the pushrod or clevis is damaged, the unit is a sealed rolled-lip design not built to open, or the fault is on the spring side. Because air brake diaphragms and spring brakes are safety-critical, a technician who is unsure should fit a new chamber rather than reuse questionable hardware.
Whichever route you take, the goal is a chamber that holds air with no leak at any pressure — from the low-air warning point near 60 psi up to a fully charged system around 120 psi — and delivers full pushrod travel every time the driver hits the treadle.

Need the part, not just the answer?
OE-grade air brake compressors and repair kits, manufactured and tested to commercial-vehicle standards.
Shop VADEN partsPublished by VADEN Original. Product links point to the manufacturer’s official catalogue. Specifications are general — always confirm figures against your vehicle’s service manual.