 airbrakecompressor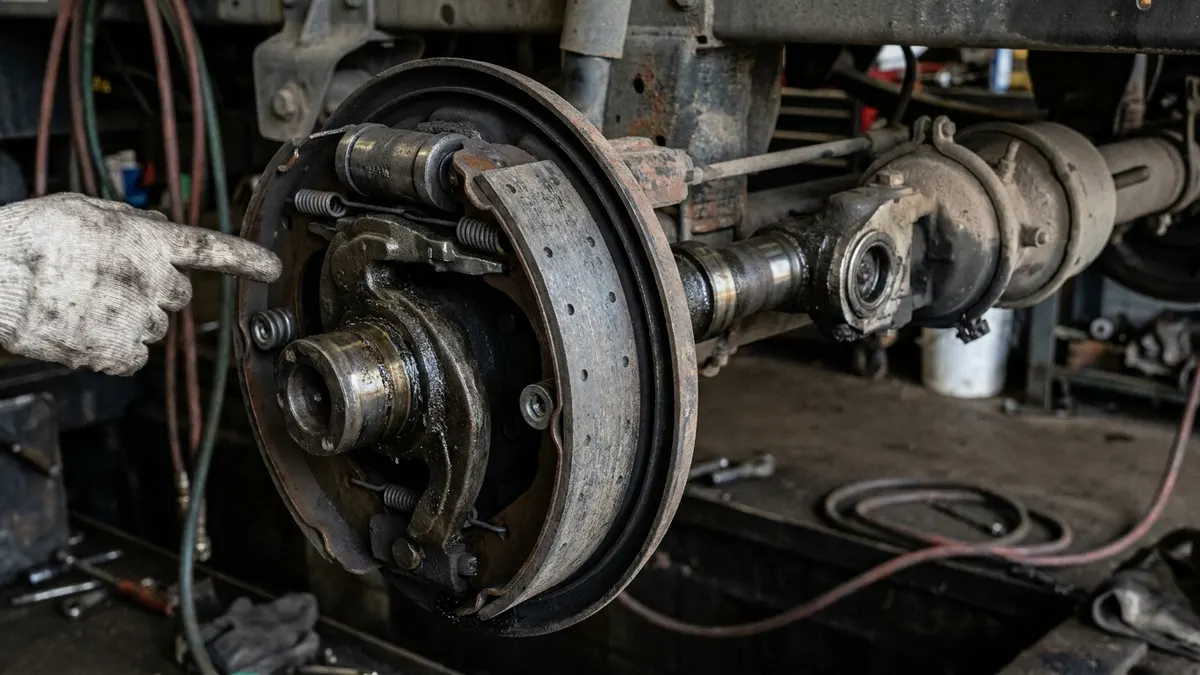
S-cam bushings support each end of the brake camshaft — one at the axle-mounted camshaft support bracket, one in the spider or brake head — while the rollers sit between the cam head and the brake shoe webs. When those bushings wear, the shaft floats radially instead of rotating on center, so the cam head no longer lifts both shoes at the same moment: you get lash at the slack adjuster, brakes that drag or release slowly, and linings that wear tapered or one-sided. An S-cam bushing kit restores that support with new bushings, seals, washers and retaining hardware, and a matching roller kit replaces the rollers and their retainer clips.
What the bushings and rollers actually do
Air brakes are pneumatic, not hydraulic. The brake chamber converts system air pressure into a straight pushrod force, the pushrod swings the slack adjuster, and the slack adjuster rotates the camshaft. The S-shaped cam head then forces the two shoe rollers apart, pressing the shoes into the drum. On a fully charged truck the reservoirs sit around 120 psi, with the governor cutting out somewhere in the 120-135 psi band, so a large share of that pressure ends up as bending load on one side of a long, slender camshaft. For the mechanical layout behind this, see our overview of S-cam foundation brakes.
The bushings carry that side load and keep the cam head centered between the shoes. The rollers do the other half of the job: they let the cam head slide across the shoe web with rolling friction instead of scrubbing. A roller that has gone flat, brinelled, or seized in its retainer turns the cam-to-shoe interface into a sliding, grabbing contact — which shows up as high pushrod effort, jerky application, and a brake that will not release cleanly.
Symptoms of worn S-cam bushings and rollers
- Brake keeps going out of adjustment. An automatic slack adjuster chases the extra lash created by shaft play, then gives it back as soon as the load reverses.
- Uneven or tapered lining wear. One shoe on the axle end wears noticeably faster, or a single shoe wears heavier at one end.
- Dragging or slow release. Binding in a dry, corroded bushing holds the cam partly rotated after the chamber exhausts.
- Visible cam head movement. Pry on the cam head with a bar and the whole shaft lifts and drops instead of just rotating.
- Grease pushing out at the seals, or none at all. Failed seals let water and road salt into the bushing bore.
- Rattle or clunk over bumps from an axle end with no brake application.
- Uneven pushrod stroke across an axle when you compare left and right during a chock-and-apply check.
Diagnostic table
| What you see | Likely cause | Confirming check |
|---|---|---|
| Cam head lifts when pried; audible knock | Worn support bracket and/or spider bushing | Dial indicator on cam head, lever the shaft up and down; compare to OEM radial play limit |
| Shoe wears tapered heel to toe | Cam head cocked by uneven bushing wear | Remove drum, check shoe contact pattern and roller seating |
| Brake drags after release | Corroded or dry bushing binding the shaft | Disconnect slack, turn the camshaft by hand — it should rotate with light effort |
| Grabby, notchy application | Flat-spotted or seized roller | Spin each roller by hand; it must rotate freely and show a round, unmarked face |
| Roller missing or displaced | Broken retainer clip or collapsed roller | Visual, drum off; inspect both retainers |
| Stroke drifts long again days after adjusting | Excess shaft lash absorbed by the slack adjuster | Re-measure stroke against the applicable limit for the chamber size |
How to inspect
- Chock the wheels, release the parking brakes only when it is safe to do so, and work with the axle end supported. Remember that spring brakes apply mechanically as pressure falls into the 20-45 psi range, so plan the air state before you start.
- With the drum off, grip the cam head and lever it radially with a pry bar. Any lift you can feel by hand is already more than the design clearance.
- For a number, set a dial indicator against the cam head or the shaft journal and lever the shaft. Most axle manufacturers condemn the assembly when radial play reaches roughly 0.020-0.030 in (0.5-0.8 mm); use the figure in the axle maker's manual rather than a rule of thumb.
- Check axial float. The shaft should have a small amount of end play controlled by the spacer and snap ring, not travel freely in and out.
- Rotate each roller. It must turn under thumb pressure and show no flat, no galling, and no blue heat marks. Check the retainers are intact and the roller sits square in the shoe web.
- Inspect the cam head lobes and the shaft splines. Scalloped lobe faces, spline wear, or a shaft that has worn undersize at a journal means the camshaft is replaced along with the bushings.
- Re-check pushrod stroke on both sides after service and compare it against the brake adjustment limits for the chamber size fitted.
What an S-cam bushing kit includes
Kit content varies by axle family, but a complete bushing kit for one camshaft normally covers:
- Two bushings — the support bracket bushing and the spider/brake head bushing. These may be bronze, nylon or a polymer-lined type depending on the axle design.
- Grease seals for both ends, which are what keep the new bushings alive.
- Thrust washer and spacer washers that set axial position.
- Snap ring or retaining ring for the shaft end.
- Sometimes a bushing installation sleeve or driver, and on some designs a slack adjuster spline washer.
Roller kits
Roller kits are usually sold per brake or per axle and contain the two cam rollers plus their retainer clips or pins. Many technicians order them together with a shoe return spring kit and the shoe retaining hardware, since all of it comes apart in the same operation. Replace rollers in matched pairs on a brake — mixing a new roller against a worn one reintroduces the uneven lift you were trying to cure.
Rule of thumb: if the drum is off and the shoes are out, the rollers and bushings get inspected. They cost a fraction of the labor to reach them.
Replacement notes
Drive the old bushings out with the correct driver rather than a chisel — a scored bore will not hold the new bushing square, and a cocked bushing wears out in months. Clean the bore of rust and old grease so the bushing seats fully. Fit the seals with the lip facing as the manual shows; installed backwards, they pump water in instead of keeping it out. Check the camshaft journals with a micrometer before reassembly, because a worn shaft will chew a new bushing quickly. Torque the support bracket fasteners and the slack adjuster hardware to OEM values, and never reuse a stretched or corroded snap ring.
After assembly, purge grease through both fittings until fresh grease appears at the seals, but stop there — over-greasing can push a seal out or force lubricant toward the linings. Follow the interval in the axle service literature and see our notes on greasing slack adjusters and camshafts for the practical routine. Finally, adjust the brakes, verify pushrod stroke is even across the axle, and confirm the brakes release fully with the system charged to normal running pressure.
Replace or reuse?
Reuse is defensible only when radial play is within spec, the seals are intact and holding grease, the shaft turns freely by hand, and the rollers are round and free. Anything else — measurable play, a dry or rusty bore, a flat on a roller, a torn seal — is a replace call. Bushings and rollers are among the cheapest parts in the foundation brake, and the failure mode they cause is uneven braking across an axle, which is exactly what roadside inspectors and out-of-adjustment findings pick up on.

Need the part, not just the answer?
OE-grade air brake compressors and repair kits, manufactured and tested to commercial-vehicle standards.
Shop VADEN partsPublished by VADEN Original. Product links point to the manufacturer’s official catalogue. Specifications are general — always confirm figures against your vehicle’s service manual.