 airbrakecompressor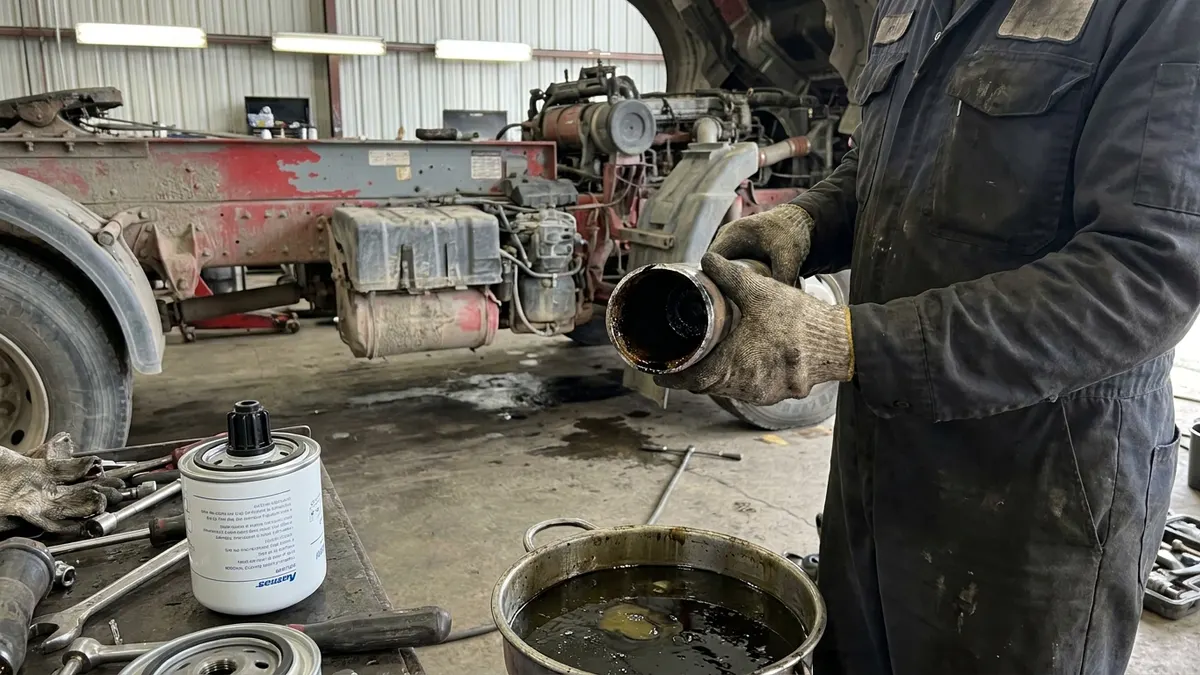
Carbon buildup in an air brake compressor discharge line is coked oil. A small amount of lubricating oil always works past the compressor's piston rings; when that oil hits a discharge line running at several hundred degrees, it bakes onto the wall as a hard, glassy black crust. The crust narrows the bore, restricts airflow between the compressor and the air dryer, and pushes discharge temperature and head pressure higher still — which cokes the line faster. The end result is slow air build, an oil-soaked dryer, and usually a failed compressor.
What coking is, and where it forms first
Coking is thermal breakdown, not corrosion or ordinary sludge. Oil vapor carried in the compressed air condenses on the metal wall, loses its light ends to the heat, and leaves behind carbon. It always starts where the air is hottest and slowest-moving: the compressor discharge port, the first fitting, the first 12 to 18 inches of line, and any elbow or tight bend where flow separates. Because it builds from the wall inward, the line looks fine from the outside right up until the bore is down to a pencil hole. On a heavily loaded unit you can find a discharge fitting with a bore the diameter of a coffee stirrer while the tubing three feet downstream is still clean.
The discharge line is a heat exchanger, not just plumbing
Air leaving the compressor head is hot from compression itself — under sustained loaded running, discharge temperatures well above 300 °F (roughly 150 °C) are normal, and that is the temperature range where oil starts to carbonize. The discharge line's job is to shed that heat before the air reaches the dryer, because desiccant cannot pull moisture out of air that arrives hot. That is why OEMs specify a minimum discharge line length (some add a coil purely to gain length), a continuous downward slope to the dryer with no low spots that trap water, no sharp bends, and a specific line material — steel, copper, or a heat-rated PTFE-lined braided hose. Plain nylon tubing has no business at the compressor end.
Anything that shortens, insulates, or kinks the discharge line raises the temperature at the dryer inlet. Rerouting a line "to make it fit" after an engine or firewall change is a classic cause of a system that cokes up every 18 months.
Symptoms of a restricted discharge line
A restriction between the compressor and the dryer looks a lot like a worn compressor, which is why plenty of good compressors get replaced for nothing. Work through the table before condemning the pump.
| What you see | Why carbon causes it | Check |
|---|---|---|
| Slow build from cut-in (about 100-110 psi) up to cut-out (about 120-135 psi) | Reduced bore limits flow into the reservoirs | Time the build from 85 psi to cut-out against the OEM spec; compare with other build-pressure causes |
| Compressor stays loaded far more than it should | System never reaches cut-out quickly, so duty cycle climbs | Listen at the compressor and watch the governor cycle at idle with no leaks |
| Weak dryer purge, or purge blows oily mist | Restricted flow plus oil carryover | Watch the purge valve at cut-out; check the cartridge and the discharge line together |
| Oil in the wet tank, gauge lines, and downstream valves | Dryer saturated with oil no longer holds anything back | Crack the drain on the supply reservoir |
| Repeat head gasket or reed valve failures | Back pressure and heat at the head | Inspect the discharge port and first fitting before fitting the new head |
| Blistered paint or discolored tubing near the compressor | Sustained overtemperature | Trace the whole run for kinks, low spots, and wrong tubing |
| Low-air warning (around 60 psi) coming on during heavy brake use | The pump cannot keep up through the restriction | Fix the restriction and the leak rate before adding air capacity |
How to inspect the line
- Shut the engine down, chock the wheels, and drain all reservoirs to zero. Remember that the spring brakes apply as system pressure falls into roughly the 20-45 psi range — the truck must be chocked, not held by air.
- Let everything cool. The discharge line and compressor head will burn you well after shutdown.
- Disconnect the line at the compressor discharge port and at the dryer inlet.
- Sight through the line and probe the first few inches of bore at each end. A hard black ring you cannot scratch off with a fingernail is coke. Any measurable reduction in bore means the line is finished.
- Inspect the discharge port in the compressor head itself, plus every fitting and elbow. Fittings coke worse than tubing because of the flow restriction they already create.
- Pull the air dryer cartridge and look at it. Oil staining or a heavy carbon smell tells you how long this has been going on and whether contamination has already moved downstream.
Why the oil is there in the first place
Carbon needs oil plus heat. Replacing the line without finding the oil source just buys you a few months. The usual culprits:
- Worn compressor rings, bore, or valves — the classic case of a compressor passing oil into the air system.
- Restricted or kinked oil return line back to the engine, which floods the compressor crankcase.
- High engine crankcase pressure from blowby or a plugged breather, pushing oil into the compressor.
- Restricted intake — a plugged engine air filter or a fouled compressor intake filter creates vacuum that pulls oil past the rings.
- High duty cycle from system leaks, an oversized accessory load, or a governor that will not unload. As a rule of thumb the compressor should run loaded no more than about a quarter of the time.
- Undersized or badly routed discharge line that never lets the air cool.
The repair, done properly
- Replace the discharge line and every fitting in it. Do not drill it out, torch it, or run a wire through it — cleaning a coked line leaves loose carbon that travels straight into the dryer, the check valve, and the brake valves.
- Fit the OEM line type and length. If a previous repair shortened or rerouted it, restore the original run with a downward slope to the dryer.
- Replace the air dryer cartridge, and inspect the purge valve and the inlet check valve. Follow your normal cartridge replacement procedure rather than reusing a saturated element.
- Blow out or replace the governor unloader line. Carbon and gum collect in that small-bore line too, and a compressor that cannot unload runs loaded constantly.
- Repair the oil source. If the compressor is worn beyond a top-end kit, fit a correctly specified unit — matching displacement, mounting, and cooling type — from a range of OE-grade air brake compressors rather than whatever bolts up.
- Drain every reservoir, then verify build time, cut-in and cut-out, and a clean purge at cut-out before the truck goes back to work.
Keeping it from coming back
Once the system is clean, the maintenance is unglamorous but effective. Drain the reservoirs on a routine — daily on a wet tank without an automatic drain. Service the dryer cartridge on schedule rather than on failure. Chase air leaks aggressively, because every leak raises duty cycle and duty cycle is what heats the discharge line. At each cartridge change, break the discharge line loose at the dryer and look at the bore; catching a partial restriction early costs a length of tubing instead of a compressor, a dryer, and a shop day.

Need the part, not just the answer?
OE-grade air brake compressors and repair kits, manufactured and tested to commercial-vehicle standards.
Shop VADEN partsPublished by VADEN Original. Product links point to the manufacturer’s official catalogue. Specifications are general — always confirm figures against your vehicle’s service manual.